
How to add products to your Frontpage store
Create a product, set its price and options, and check how customers will buy it.
This guide adds one product to your store and explains how to check it before you offer it for sale. The example is a cotton cap sold in Small and Large, with a price and stock count for each size.
Before you start
Store is available on paid plans. An editor or administrator can manage products. A site administrator handles payment account setup where required.
Have the product name, a short description, photos, price, and available stock ready. For a physical product, decide whether customers will collect it or receive a delivery. If this is your first product, complete the Store setup steps and the required payment connection before expecting checkout to work.
1. Open a new product
Choose the correct site in your workspace. Under Business, open Store. In Products, select Add product.
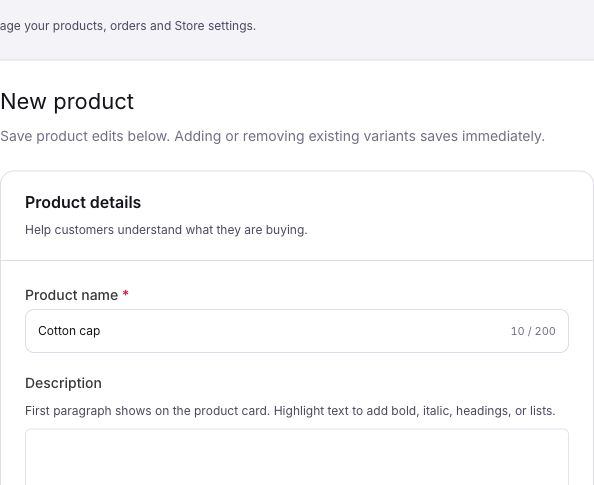
Enter the Product name. Use the name customers recognize, such as “Cotton cap.” Write the Description with the details a customer needs to decide: material, fit, what is included, and any care instructions.
The first paragraph appears on the product card, so put the most useful information first. You can highlight description text to add supported formatting such as headings, bold text, and lists.
2. Set the price and stock
In Pricing and stock, enter the normal Price in the store's displayed currency. For example, enter 24.00 for a cap priced at $24 in a USD store. Do not type an amount in cents.
Leave Sale price blank unless you are offering a sale. If you need to limit how many customers can buy, enable Track stock and enter the quantity you have. With stock tracking off, the product has no local stock limit.
Use your real stock count. A stock count of zero and an unlimited quantity mean different things. If you sell separate sizes or colors, set up variants so each option has the right price and stock.
3. Add sizes or colors as variants
Turn on This product has variants. Enter an Option name, such as Size. Then add each value you sell, with its price and stock settings, using Add variant.
For the cap, add Small at $24 with five available, then Large at $24 with eight available. Review both rows before saving. A value such as “Small” belongs under the Size option; it should not become a second unrelated product just to offer a size choice.
For a new product, the variants save when you save the product. When editing an existing product, adding or removing a variant saves immediately; price, stock, and value edits use Save changes. Read the message above the variant list before making changes.
4. Add product photos
In Images, drag photos into the photo area or choose Upload from computer. The editor also supports your existing image library. Use photos you own or have permission to use.
Show the whole item clearly, then add useful views such as the side, back, or a close-up of the material. Check the order and cropping in the preview. A photo should help a customer judge the actual product, not show a different item.
5. Review product type and customer choices
Keep Physical product on for the cap because customers must collect it or receive it. Turn it off only when the item does not need physical pickup or delivery. This setting controls fulfillment requirements; it does not, by itself, create an automatic download.
For a physical item, use Extra shipping only when it needs an extra charge per item on top of the order's shipping price. Leave it blank when the normal order shipping price is enough.
Customer choices can collect extra information, such as a short gift message. Use variants for choices that change the product price or stock. Customer-choice answers do not change the price, and a requested date is not a confirmed appointment.
6. Choose categories and availability
Use Categories to place the cap with related products, such as Hats. Review the In your Store preview for the name and price.
Check Available for sale. Turn it off if the product is not ready for customers to buy. This keeps the product in your catalog while stopping new sales.
In Store → Settings, review the delivery or pickup methods relevant to your products and the checkout settings. Payment readiness is separate from product availability. A saved product alone does not complete payment account setup.
7. Save and reopen the product
Select Save changes. Read any error and wait for the save to complete. Go Back to products, find the product, and reopen it. Check the saved name, description, photos, variants, prices, stock, and availability.
If a leave warning appears while edits remain unsaved, choose Cancel to finish saving or Discard and continue to lose those edits. The warning is not a substitute for saving.
8. Check the customer purchase path
Open the public store and find the product. Check it on a phone as well as a computer. Confirm that the photos load, the description is readable, the correct sizes appear, and the price matches the selected variant.
Select Add to cart, check the cart, and review the available pickup or delivery options. Use your approved payment testing process if you need to test a completed order. Do not place a real charge just to check the product layout.
Product data saves through Store. If your website does not yet have a Store page, product section, or purchase link, ask the Agent to add the required website layout. Review and publish that website edit separately.
Common problems
- The product will not save: check the displayed validation message, required name and price, and any incomplete variant rows.
- The product cannot be bought: check Available for sale, tracked stock, payment readiness, and physical delivery or pickup settings.
- A size is missing or has the wrong price: reopen the product and check the saved variant, then check the selected option on the public product page.
- The product is saved but has no purchase link: check whether your website has a Store layout that displays or links to the product.
Finished: the product reopens with the saved details and a customer can find the right option and follow the intended purchase path.