
How to set your website brand and styles
Set your business identity and shared website styles, then check the pages customers see.
Use Brand & styles to set the business name and logo used in emails and the workspace, then review the shared colors, fonts, spacing, and corner shapes behind your website.
This guide uses a bakery that wants a clear logo, readable text, and the same main button color across its pages. Prepare your real business name, a logo file, and any colors you already use. You can keep the existing design and change one group of styles at a time.
Before you start
Select the correct website and sign in as a site administrator. Open Site settings → Brand & styles. Only admins can manage these settings.
The page has two separate jobs. Brand identity sets your name and logo for emails and the workspace. Website style controls change shared design values used by your pages. Saving one does not automatically do the other.
Your public header, page text, and logo keep their existing content until you change them in the site editor. Email sender names and reply addresses are separate settings under Emails. A logo change does not change where replies go.
1. Set your business identity
In Brand identity, choose Edit brand. Enter your business name and use Upload logo or Replace logo to choose a file. You can also drag a logo into the upload area.
Use a PNG, JPG, WebP, or SVG file under 2 MB. Choose an image that stays clear at a small size. The preview shows your name and logo together before you save. If there is no logo, Frontpage can show initials instead.
Choose Save brand and check the saved name and logo. This updates the identity used by emails and the workspace without publishing website files. For the bakery, check that the full business name appears and the logo has not become too small to read.
If you choose Reset to automatic, Frontpage returns to an identity drawn from your site and refreshes it on the next publish. Use that option only when you want the automatic identity instead of the values you set yourself.
2. Review the shared website styles
Look at Website style reference. Its sample shows the saved shared colors, font families, spacing, and shapes. It is a reference, not a full preview of every page.
Shared styles are a starting point. A page or component can use its own colors, fonts, or spacing. If one button stays different after a shared style change, inspect that button in the site editor rather than repeatedly changing the entire palette.
If the page says Shared styles aren’t available, use Open site editor. Frontpage has not confirmed editable shared values for that site's source. Ask the Agent for a specific design change instead of guessing values that may not control the page.
3. Choose your colors
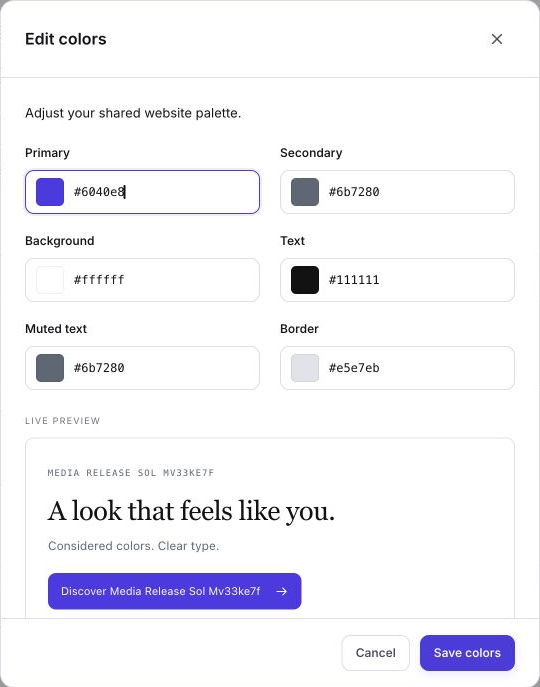
In Colors, choose Edit colors. Review the six roles: Primary, Secondary, Background, Text, Muted text, and Border.
For the bakery, set Primary to the approved brand color and keep strong contrast between Text and Background. Check lighter secondary text as well as headings. A color that looks good in a large swatch may be hard to read on a small button.
Use the color picker or enter a supported hex, RGB, or HSL value. The live sample helps you inspect the combination before saving. Choose Save colors to update the website draft and request a preview build. Choose Cancel to leave the saved colors unchanged.
4. Choose fonts that stay readable
In Typography, choose Edit fonts. The shared families include Sans serif, Serif, and Monospace, with an optional Display font. Each page decides which family it uses for headings and body text.
The picker includes Inter, Arial, Verdana, Trebuchet MS, Georgia, Times New Roman, System monospace, and Courier New. A current custom family may also appear. Choosing a family does not upload a new font file.
Keep the bakery's body copy easy to read before choosing a more decorative heading. Font samples use fonts available on your device; the actual website loads its own font files. Check the built page instead of assuming the workspace sample is an exact match.
Choose Save fonts when the shared families are correct. If you want a specific font on one heading, ask the Agent for that targeted page edit instead.
5. Adjust spacing and corners only where needed
Use Edit spacing to change the shared spacing scale. Use Edit corner shapes for Base corners and Fully rounded values. Keep existing values if your page layout already reads well.
These controls accept zero or positive lengths in px, rem, or em. They change elements that use those shared values, not every gap or shape on every page. Make a small change, save that group, and inspect the preview before changing another group.
6. Review the build and publish
After a website style save, choose Open site editor. Wait for the preview build to finish. If the styles saved but the preview build could not start, the message offers Retry preview build. Retrying the build is separate from publishing.
Check the homepage, a service or product page, and a contact page. For the bakery, inspect the menu headings, order buttons, and enquiry form. Check phone-sized layouts, long text, links, and button states as well as the main heading.
To change the public website name or logo, ask the Agent to update the relevant header and footer in the site editor. For example: “Use my approved bakery logo in the header and footer. Keep the menu, links, and page layout unchanged.” Review those website edits too.
Choose Publish when the reviewed website is ready. Then open the public address and check the same pages. Website style saves change the draft; Publish makes the reviewed website version public.
Common problems
- A logo upload fails: check the format and file size. Try a clear PNG or JPG if the original image cannot be opened.
- One page did not change: it may use local styles. Ask for a targeted edit to that page or component.
- The font looks different: compare the actual built website with the workspace sample and check which family the page uses.
- The public website still looks old: confirm the preview build finished and the reviewed version was published.
Check your result: your saved identity is correct, the built pages use the intended styles, and the published website matches the version you reviewed.
Frequently asked questions
Will changing my shared styles affect more than one page?
It can. Pages that use the shared colors, fonts, spacing, or corners will use the updated styles. Review several pages in the preview before publishing.
Does saving a new font make it live right away?
No. Check the new font in the website preview first, including on a phone. Publish the ready website when you want visitors to see it.
Where can I change the business name and logo?
Open Brand & styles in the site workspace and review the business identity settings. Check where your website uses the name and logo before publishing.