
How to collect enquiries with a contact form
Let visitors ask for a quote or send a question, then find their saved message in your workspace.
A contact form gives visitors a clear way to ask about your services. Frontpage saves accepted enquiries in your workspace and sends a notification to the inbox configured for that form.
For example, a repair business can ask for a customer’s name, email, and a short description of the problem. The team can then read the request and reply without asking the customer to repeat it.
Before you start
Contact forms can collect enquiries on the Free plan as well as paid plans. You need edit access to change your website. A site administrator manages the form’s notification settings and collection switch. Editors and administrators can read saved submissions.
Decide what you need to respond: usually a name, an email address or phone number, and the customer’s question. Keep the form short. A form should collect the information needed for the next conversation, rather than every detail you might ask later.
1. Ask the Agent to add the form
Open your site editor and tell the Agent where the form belongs, what it should ask, and what visitors should see after submitting. For this example, use:
Add a quote request form to my Contact page. Ask for name, email address, and a description of the repair. Require the email and description. Label the button “Request a quote.” After submission, show “Thanks. We have received your request and will reply within one business day.”
Only promise a response time your team can meet. Review the form the Agent adds, including labels, required fields, button text, and the thank-you message.
Ask the Agent to change the website fields or layout if needed. Contact & lead forms manages the saved form settings and enquiries; it is not where you design the website form.
2. Review the form’s settings
In your workspace, open Customers → Contact & lead forms. Under Forms, open the form you just added. A site can have more than one form, so choose the correct name.
Check that collection is On. Turning a form Off hides it and stops collection. It keeps past messages saved.
Under Form email notifications, check Send new submissions to. Enter the inbox your team will monitor and save that field. If a notice asks you to review the notification address, check it and select Looks good when it is correct.
Each form notifies one email address. If several team members need a copy, use a shared inbox or forwarding from that inbox. Do not put a comma-separated list of addresses into the field. Replying to the notification lets you respond to the visitor when the submission includes a usable email address.
3. Decide whether visitors need a confirmation email
The on-page thank-you message and a confirmation email are separate. The thank-you message appears after a successful submission. A confirmation email sends a separate message to the visitor.
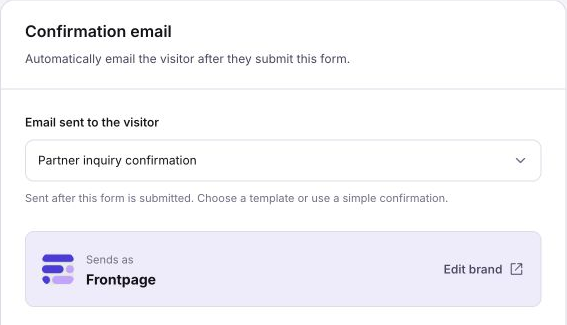
On a paid plan, open Confirmation email and choose the Email sent to the visitor option that fits: Off, Simple confirmation, or a saved template. Keep confirmation off if the on-page message is enough. This choice saves when you select it. Wait for the update to finish and read any error.
To send an email, the form must collect the visitor’s email address. If you choose a template, use only customer fields the form collects. A template field that the form does not provide can appear blank. The setting shows warnings for missing fields.
Confirmation emails use your email allowance. Reaching the allowance does not remove the saved enquiry. A confirmation should acknowledge receipt; it should not claim that a quote, repair date, or appointment has been approved.
4. Publish the website form
Review the form on a computer and phone. Check that the labels are readable, required fields are clear, and the button is easy to use. Then publish the website edit when you are ready for visitors to use it.
Saving the form’s notification address does not publish a new website layout. Publishing the website and saving ordinary form settings are separate actions. If you only change the notification address for an existing live form, save that setting; you do not need to rebuild the page.
5. Send one clearly marked test enquiry
Use your own contact details on an authorized test site or your own form. Enter a message such as “TEST: Repair quote form check. No quote needed.” Avoid real customer details.
Check the required fields by trying to submit with the email or description missing. Then fill them in and submit once. Confirm that the page shows the intended thank-you message.
Check the configured notification inbox. If visitor confirmation is enabled, also check the test visitor’s inbox. These are two different messages and can have different delivery results.
6. Find the saved enquiry
Return to Contact & lead forms. Open the form and check Saved submissions, or use the Inbox tab to review enquiries. The inbox also includes appointment requests, so check the form and submitted details.
Find your marked test message and compare the name, contact address, repair description, and received time with what you submitted. Use the available refresh control if the view has not updated. The full inbox also offers Download CSV.
A saved submission confirms that Frontpage received the enquiry. It does not, by itself, confirm that a notification email arrived. Check the destination inbox separately.
Optional: send a copy to an external CRM
If your business uses HubSpot, Pipedrive, or Privyr, an administrator can configure a supported connection under Destinations and attach the relevant form. Where a connected destination is available, the form’s settings show Also send a copy.
This sends a copy of the enquiry to that service. It does not create a two-way sync. Frontpage keeps the saved submission even when you also send a copy elsewhere. You do not need an external CRM to use contact forms.
Common problems
- The form does not appear in the workspace: check the correct site and ask the Agent to confirm it created a working contact or lead form. A decorative form alone cannot collect enquiries.
- The form is hidden or cannot accept submissions: check its collection switch and whether the page containing it has been published.
- The enquiry is saved but the notification is missing: check the form’s notification address, spam folder, and any notification review notice.
- The visitor did not get a confirmation: check the paid plan, chosen confirmation option, email field, and remaining allowance. Check the saved enquiry even if email delivery failed.
Check your result: a visitor can submit the public form, the thank-you text appears, and the marked test enquiry is visible in the correct workspace inbox.