
Your domain is the address customers use to reach your website. Start from your existing site’s Overview. You can keep editing your draft while you set it up.
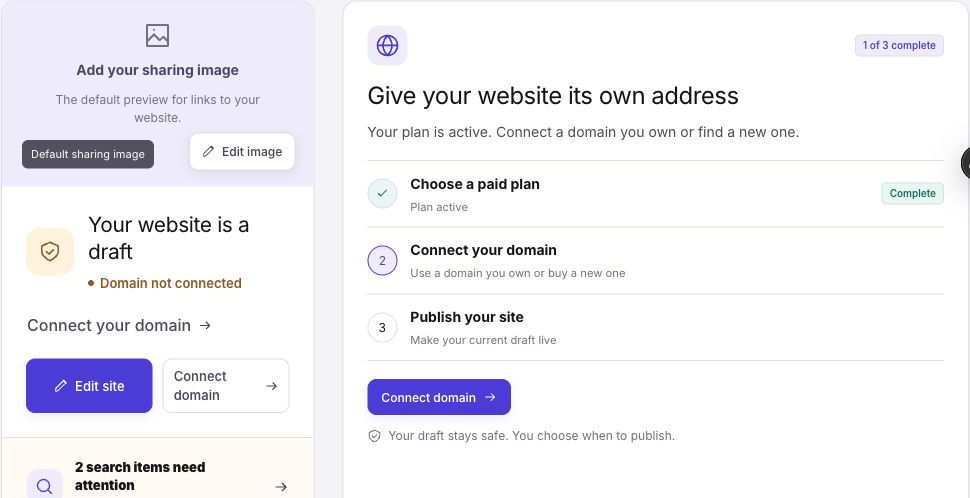
1. Choose your site plan
If Overview shows Choose a plan, select a paid site plan that supports your custom domain. You can review your site’s subscription in Usage & plan.
Your Frontpage site subscription is separate from connecting Stripe to accept customer payments. You do not need to finish Stripe setup to publish your website.
2. Open domain setup
Select Connect domain on Overview, or open Domains in the workspace. Choose the option that fits your address:
- You own a domain: connect it while keeping it with your current registrar, or use the transfer option if you want to move its registration.
- You need a domain: search for and buy an available domain through the domain flow. Review its price and registration details before purchase.
- You want a subdomain: enter that exact address, such as
www.yourbusiness.com, and follow its instructions.
Domain and subscription changes require an admin. If you cannot make those changes, ask your site admin to complete setup.
3. Follow the connection instructions
DNS verification continues in the site editor’s domain/publish flow. Use Open site editor in Domains when prompted, then open Publish to continue the connection checks.
Use the guided provider connection when it is available, or follow the manual DNS instructions shown for your domain. Add the exact records Frontpage gives you. Records depend on the address and setup, so do not copy DNS values from another website or an old guide.
If someone else manages your domain, ask them to make the displayed changes. Keep email records such as MX and email-related TXT records unless your email provider has instructed otherwise. If you are replacing an existing website at the same address, plan for that change before changing DNS.
4. Wait for the connection checks
An address being added is not the same as a ready connection. Frontpage checks that the required domain addresses point to the site and that the secure connection is ready. While checks are pending, Overview offers Finish domain connection.
Return to Domains to read the current instructions and status. DNS changes can take time to appear. If setup remains pending, check for conflicting records and confirm you changed DNS at the provider that manages the domain’s nameservers.
5. Publish your site
Once the plan, domain, and preview build are ready, Overview enables the third step: Publish your site. Select it, check the address, and confirm. Connecting the domain alone does not publish your draft.
After publication succeeds, use View site to check the live website. Later website edits stay in your draft until you publish again.
If you need help
Keep the exact domain and the message shown in Domains handy. The subdomain walkthrough has more detail for subdomain connections. For account help, contact support@frontpage.host; never send your registrar password.
You’re done when: your domain is connected, publication succeeds, and your intended website appears at the address.