
How to accept payments on your website
Connect Stripe, create a payment offering, and let customers pay from your website.
Use Payments to collect money for a service, deposit, or other saved offering. This guide uses a simple example: a consultant wants a Pay now button for an initial consultation. The consultant sets the price, saves the offering, and adds that offering to the services page.
An offering stores the payment details. Its button starts checkout. Publishing a button does not collect money, and saving an offering does not mean Stripe has approved your account.
Before you start
Standalone Pay now, invoices, and recurring billing are available on Free, Starter, Growth, Scale, and Enterprise. Use a site administrator account to connect Stripe and manage payment offerings. Editors can view private payment activity; viewers cannot. This walkthrough covers standalone Pay now.
Have your business and bank details ready for Stripe. Stripe collects and checks the information it needs. Available payment services depend on your account and location. Choose the right website in the workspace before you begin.
1. Connect Stripe
Open Business → Payments. If this is your first setup, choose Set up payments. Complete the requested steps securely on Stripe, then return to Frontpage.
If setup is unfinished, use Continue in Stripe. If Stripe is reviewing your account, follow the displayed instructions and watch for any request for more information. Returning from Stripe alone does not prove that your account is ready.
Choose Refresh status to check again. Look for Ready to accept payments. Payments must be on, Stripe must allow charges, and the account currency must be confirmed before new payments can start.
Under Settings, check Currency. Frontpage reads it from the connected Stripe account. Store, payment offerings, and invoices use this shared currency. Do not assume that a dollar symbol or a price written on a page sets the account currency.
2. Create a saved offering
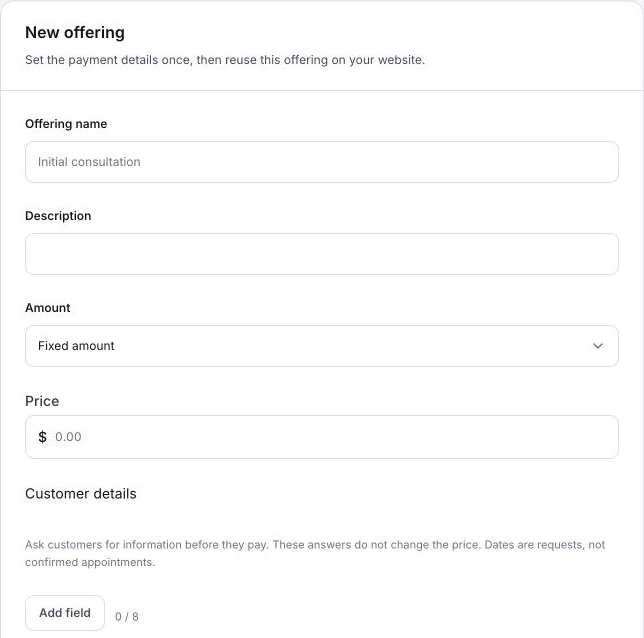
Open Offerings and choose Create offering. Enter an Offering name, such as “Initial consultation,” and a short Description explaining what the customer is paying for.
Set Amount to Fixed amount and enter the agreed Price in the displayed currency. For a payment where the customer picks the amount, choose Customer chooses the amount and set the Minimum amount instead.
Use Customer details → Add field if you need information before payment. For the consultation, a short question about the topic may help. Answers do not change the price. A requested date is not a confirmed appointment.
Under Confirmation email, keep Default receipt or select an appropriate saved template. The confirmation follows verified payment; it is not a payment request. If you use a custom template, check its wording and supported payment details before attaching it.
Check Available for new payments, then choose Save offering. Open the saved offering again and confirm its full name, amount, and availability. An available offering still needs ready Payments to accept a charge.
3. Add its Pay now button
Open the site editor and ask the Frontpage Agent to use the saved offering. For example:
Add a Pay now button for my saved Initial consultation offering to the services page. Use that existing offering and its saved price. Keep the rest of the page unchanged.
Check that the Agent reused the intended offering rather than creating another one. Review the button label, description, and displayed price. One offering can serve buttons on more than one page, so changing its saved price can affect each place that uses it.
The page button and its layout are website edits. Wait for the preview to be ready, review it, and choose Publish when you want visitors to see the button. Later edits to the saved offering's payment details do not need a page republish; changes to the page design do.
4. Check checkout before sharing the page
Open the published page on a computer and a phone. Choose the payment button and check the offering, currency, amount, and any customer questions. Close checkout without confirming a payment if you are only checking the setup.
Opening checkout is not a test charge or proof of a completed sale. Do not enter a test card into live checkout. Stripe test payments belong in an environment explicitly configured for testing. This walkthrough does not require a real charge.
For physical products with a cart, stock, shipping, or pickup, use Store instead. The standalone consultation payment does not need Store fulfillment settings.
5. Find a completed payment
When a customer pays, open Payments → Activity. Use Activity type and Activity status to find the record, then open it. Check the recorded status, amount, currency, and customer details before treating it as paid.
A customer reaching checkout or receiving an email is not the same as confirmed payment. A payment is also different from a payout to your bank. Stripe controls account review and payout timing. Check your Stripe account for its current payout schedule and applicable processing fees; see Stripe's payout help.
Common problems
- Payments is not ready: read the status, finish any Stripe requests, and refresh. Do not create a second offering to solve an account review problem.
- No currency appears: finish the Stripe connection and wait for currency confirmation before setting a payment amount.
- The button uses the wrong price: open the bound offering and check its saved amount. Ask the Agent to fix the button if it references a different offering.
- The button is missing publicly: confirm that the website edit finished building and that you published the reviewed version.
Check your result: Payments shows ready, the correct offering is saved and available, and the published button opens checkout with the expected details.
Frequently asked questions
Can I add a Pay now button on Frontpage’s Free plan?
Yes. Standalone Pay now is available on all Frontpage plans. A site admin must connect Stripe and finish payment setup before customers can pay.
Does saving a payment offering put the button on my website?
No. Saving creates the offering in Payments. Add its Pay now button to the website and publish the change so customers can use it.
How can I check whether Stripe is ready to accept payments?
In Payments, refresh the connection status. Look for Ready to accept payments before sharing the checkout page.